Azure Site Recovery: Hyper-V to Azure part – 6

In this series of articles, I would show how to make Azure Site Recovery work with Hyper-V- step by step.

This is part 6 of the series.

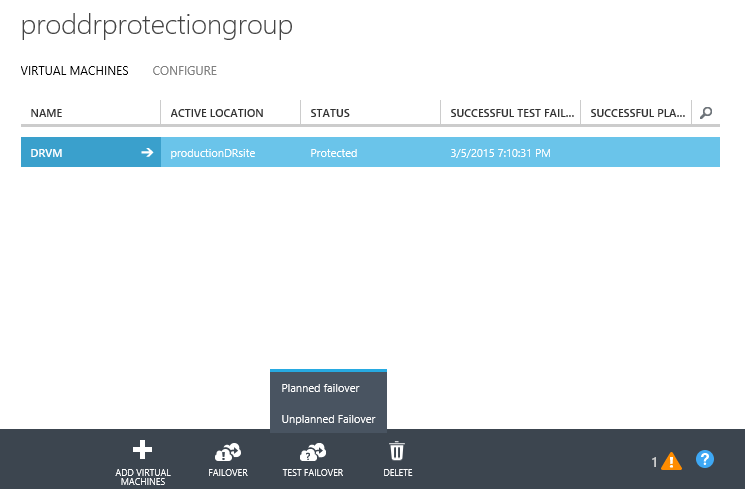
Now, it’s time for actual failover. There could be planned or unplanned failover. The difference between planned and unplanned failover is that in planned failover we shut down the source virtual machine manually and start the process of failover whereas in unplanned failover we just start or power up the virtual machine on the target datacenter. Azure site recovery provides both the options to us.

ASR-52

In this article, we will see how the unplanned failover works.

Click on Test Failover | planned Failover menu. This should pop out a window confirming the direction of failover which in this case is from Hyper-v to Azure. It would also ask whether we want to shut down the source (hyper-v) virtual machine and synchronize the target with latest changes. Select the checkbox for shutting down the source virtual machine and synchronizing latest updates as shown below and click on the complete button.

ASR-53

The process of unplanned failover will start and executes a number of steps as shown below.

ASR-54

The source virtual machine on on-premise is shut down automatically by the azure site recovery agent.

ASR-55

The progress updates of the tasks should be completed. The below screen shows that failover is in progress and tasks before failover are complete.

ASR-56

A new Virtual machine same named as on-premise virtual machine is created in a new cloud service.

ASR-57

If now if we open http endpoint with port 80 on the newly created virtual machine, I should be able to browse the same start.htm file and it should still reflect my name on that page.

ASR-58

This shows that Azure site recovery has been able to take care of my applications and services by making them available at time of disaster recovery.

As last step for failover, we have to commit the failover by clicking on the commit button as shown below. It will ask for confirmation. Click yes for the same.

ASR-59

Now, if we have to failback our virtual machine back to our on-premise datacenter, we should navigate back to the virtual machine in the protection group, select it and click on Failover button.

ASR-60

Click on Planned failover. This is because failback are and should always be planned.

ASR-61

On the resultant window, the failover direction is shown. Select appropriate radio button depending upon whether you want to synchronize data before failover or during failover. We have chosen before failover and click on the complete button.

ASR-62

This will start the process of failback. The steps to be performed for failback are shown below.

ASR-63

After reaching and completing the step “Monitoring data synchronization”, it was ask us for the completion of the failover. We will go to jobs section and select the job and click on “Complete Failover” to complete the failover.

ASR-64

Azure hosted virtual machine DRVM would be shut down.

ASR-65

The failback replication would be initiated.

ASR-66

The on-premise virtual machine is brought back to life by switching it on. The azure Virtual machine, cloud service, Storage container and VHD blobs are deleted.

ASR-67

And finally the entire process should complete successfully as shown below.

ASR-68

With this failback, we are covered the entire circle and are back to the same situation where we started from however the difference is that a disaster happened, the virtual machine was provisioned on Azure and where the on-premise datacenter was back to life, we failed back the virtual machine on it.

Now, it’s time to look at Recovery services in Azure site recovery.

The failover we did till now were manual. We can also automate the entire process. This is where the recovery plans help us. They can orchestrate the entire recovery by orderly executing tasks in a step where each step can comprise of complex workload.

Goto Recovery Services | ProductionVault | Recovery Plans | Create Recovery Plan

ASR-69

Provide name, source and target as shown below.

ASR-70

Select the virtual machines for recovery plan and click on complete button

ASR-71

The end result should look like below.

ASR-72

We can further customize the recovery plan by attached scripts to be executed before and after shutdown of the virtual machines. We can group virtual machines as well. This is very important in scenarios where you would like to shut down domain virtual machines before shutting down active directory.

With this We conclude this series on Azure Site Recovery Hyper-V to Azure Disaster Recovery.

Hope you enjoyed the series!

Cheers!!

Azure Site Recovery: Hyper-V to Azure part – 5

In this series of articles, I would show how to make Azure Site Recovery work with Hyper-V- step by step.

This is part 5 of the series.

Now it’s time to test the failover.

At this point of time, we have enabled on-premise virtual machine to be protected during times of disaster. The relevant metadata, virtual machine configuration and vhd has been replicated to azure storage created for this purpose. There is no Virtual machine created during this point of time on Azure for this on-premise virtual machine. Only at the time of disaster, a new virtual machine would be provisioned on Azure as a replica of the original on-premise virtual machine. The on-premise virtual machine keeps sending its current state every 30 second/5 min/30 min as part of continuous replication.

When we start the process of testing the failover, a new cloud service and virtual machine is created on Azure and then the same can be accessed by the users.

Under Protection group | Proddrprotectiongroup | Virtual machines, select the DRVM virtual machine and click on “Test Failover” button available at the bottom of the page.

ASR-43

On the resultant popup, select none for network since we did not create any network and click complete button. This would start the process of testing the failover.

ASR-44

Following are the steps undertaken by Azure site recovery service to test the failover.

ASR-45

And now if we navigate to the virtual machine section, we will find that a new virtual machine named “DRVM-test” is being provisioned.

ASR-46

And within the same storage account provisioned earlier, a new container created storing containing the vhd blob for the test virtual machine. This is shown below.

ASR-47

We can also see that a cloud service is created to host our test virtual machine.

ASR-48

Now, we can work with this new virtual machine the same way we would have worked with on-premise virtual machine. However appropriate endpoints needs to be opened for making this work.

After you have tested the virtual machine comprehensively it time to complete the test.

TO complete the failover test, navigate to the job specific to failover test from Azure site recovery service -> jobs and click on “Compete test” button when status is shown as “waiting for action” for complete testing step.

ASR-49

This would popup another window asking whether clean up should happen as part of completing the test. If we mark yes for this checkbox, the cloud service, virtual machine, storage container and blob file created earlier would be deleted and azure would be back to its original state. During the entire failover test process, the on-premise virtual machine can continue to run without any downtime.

ASR-50

The end status after completion of test should look like below

ASR-51

In next part (part-6), we will continue with the step by step guide and perform an actual failover.

stay tuned!

Cheers!!

Azure Site Recovery : Hyper-V to Azure Part – 4

In this series of articles, I would show how to make Azure Site Recovery work with Hyper-V- step by step.

This is part 4 of the series.

Now, it’s time to create the azure storage. Click on link “Create Storage account”.

ASR-22

On the window that slides out from bottom, provide the storage name i.e. “proddrstorage” and also location and redundancy. The location is “east asia” to maintain location consistency. This is shown below. Click on “create storage account” button. This would create a new storage account for our disaster recovery VHD and VM configuration.

ASR-23

Details of the storage account can be viewed by navigated to storage account as shown below.

ASR-24

Now, it’s time to create a protection group. Click on “Create Protection Group” from the dashboard.

ASR-25

This will take you to “Protected items” tab. Click on “Protected Groups” sub tab and “Create Protection Group” link as shown on below screen.

ASR-26

In the resultant popup window, provide Protection group name i.e. “proddrprotectiongroup” and also select the previously created hyper-v site “ProductionDRsite”.

ASR-27

Additional dropdown boxes would appear for selecting appropriate subscription and storage account. We should choose the same storage account that we created earlier.

ASR-28

Click on the complete arrow to go to next wizard window.

Select the values as shown in below screen.

ASR-29

Click on the complete button and the result should look like below.

ASR-30

The above screenshot shows that proddrprotectiongroup has been created and configured with 0 protected items. This is because we have not yet added any virtual machine to this protection group. In next step, we will be adding virtual machine to the protection group.
Also, if we navigate to Servers | Hyper-V sites, we should see below “productionDRSite” that the server on which we installed the provider and agent is visible with connected state.

ASR-31

Now, it’s time to add virtual machines to protection group and protect them during times of disaster.

I already have a virtual machine on my on-premise server name DRVM. It is shown below here.

ASR-32

It is this Virtual machine that would be used for disaster recovery. In this Virtual machine I have install IIS and have modified the start.htm page to reflect my name on it. When I browse the start.htm file, it looks like below. Notice that is shows my name.

ASR-33

Goto Recovery services | Protected Items | Protected Groups | proddrproductiongroup and click on it

On the resultant page, within “virtual machines” tab click on “Add virtual machines” link

ASR-34

On the resultant Popup window, names of all virtual machines on the on-premise server would be shown. We have just one VM DRVM and that should be visible as shown below.

ASR-35

Selecting the name of the virtual machine should bring more controls on the screen including the operating system type and operating system disk as shown below.

ASR-36

Since, DRVM is based on Windows operating system, Windows is chosen and there is only one disk so by default it is assumed as operating system disk. If there are multiple disk attached to the virtual machine, we should choose appropriate disk containing the operating system. Click on the complete button. This will start the process of protecting the DRVM virtual machine.

ASR-37

This is a time consuming job and consists of multiple steps as shown below.

ASR-38

Also, a quick look into Hyper-v manager would show that the replication has been initiated.

ASR-39

A new container is created within the storage account created earlier to store all the relevant virtual machine information.

ASR-40

Navigating to this storage container will show all the files needed to provision a virtual machine during a disaster at on-premise datacenter.

ASR-41

Once all the above steps are complete the protection is enabled. Starting initial replication takes a long time and is dependent on the size of your Virtual machine.

When you add a virtual machine to protection group, a lot of activities take place behind the scene. The entire configuration from protection group is sent to the Azure site recovery agent on the on-premise server and are applied to the virtual machine. The virtual machine is enabled for replication. It is provided configuration details of the replica server which in this case is Azure. All the other relevant details like copy frequency, retain recovery points, re-synchronization and more are set. The details that are set can be viewed by navigating to Virtual machine replication properties.

ASR-42

This completes the configuration of Azure Site recovery and our VM would still be available at the time of disaster.

In next part (part-5), we will continue with the step by step guide and test the failover.

stay tuned!

Cheers!!

Azure Site Recovery: Hyper-V to Azure Part – 3

In this series of articles, I would show how to make Azure Site Recovery work with Hyper-V- step by step.

This is part 3 of the series.

Goto the file location where the AzureSiteRecoveryProvider.exe was download and double click on it to launch and install it on the server.

Select on for Windows update on the resultant wizard window.

ASR-16

Select the installation location or leave the default one and click on install button.

ASR-17

This would install two components

1. Azure Recovery Services Agent and
2. Azure Site Recovery Provider.

ASR-18

Click on Continue button to configure them.

On the resultant “Internet connection” windows, check the appropriate option button. There is no proxy server in my environment and hence I selected “Connected directly without a proxy”. The windows should show that it is connected to internet.

ASR-19

Click on next button and select the previously downloaded vaultcredentials file by clicking the Browse button. This would result in filling the other inputboxes. The wizard queries the Azure vault with the certificate and key data available in the vaultcredentials file for verification. The vault name should reflect productionvault and Hyper-v site should reflect productionDRsite both created earlier.

ASR-20

Click on next button. Now the registration process starts. The certificate information is extracted from the vaultcredentials file and installed into the local computer certificate store. If there are no error, the below screen should be visible.

ASR-21

Click on finish button. With this the provider is successfully installed on the hyper-v server.

In next part (part-4), we will continue with the step by step guide and create the storage account along with protection groups.

stay tuned!

Cheers!!

Azure Site Recovery : Hyper-V to Azure Part -2

In this series of articles, I would show how to make Azure Site Recovery work with Hyper-V- step by step.

This is part 2 of the series.

Now time to get back to making azure site recovery work.

Login on to the server that has Hyper-v role enabled and have virtual machines in it.

Login to the Azure subscription and navigate to the “productionvault” dashboard. It should like shown below.

ASR-7

Now, it time to create a Hyper-V site.

Click on “Create Hyper-v site” link as shown on above screenshot. A popup window appears. Provide “productionDRsite” for name input and click on complete button. Again it take a while to get the Hyper-v site created.

ASR-8

After the Hyper-v site is provisioned, it would be appearing within the server tab as shown below.

ASR-9

Click on the cloud icon beside the dashboard tab as shown below to follow the next steps.

ASR-10

Click on “Download a registration key” link to download the vault credentials and keys.

ASR-11

This would pop up a window displaying the site name along with download link. Click on download link and download the vault credential file and save it on file system i.e. “C:\ASR” folder location.

ASR-12

ASR-13

Click on “Download the provider” to download the provider.

ASR-14

And save it to the same location at that of vaultcredentials file.

ASR-15

In next part (part-3), we will continue with the step by step guide and configure the downloaded provider, create the storage account and protection groups.

stay tuned!

Cheers!!